


Let's start with the fact that all electronic devices today are designed and configured to automatically connect to Wi-Fi networks, whether at home or work. Sometimes, you need to connect to watch a new episode of your favorite series, write a report, or simply play online with friends, and you can't because your laptop suddenly disconnects from the network and won't reconnect. At that moment, you wonder what to do.
Don't rack your brains trying to find the cause. In this article, we'll help you save time and solve the problem quickly.
Why doesn't my laptop detect the Wi-Fi network? How to fix it?
In a situation like the one described above, we recommend checking the following reasons:
1. Airplane Mode Enabled
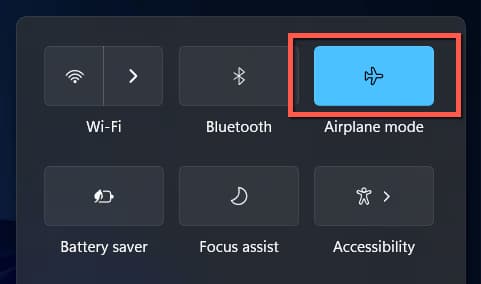
If your laptop can't connect to Wi-Fi, the first thing you should check is whether Airplane Mode is enabled. If so, an airplane icon will appear in the taskbar. You may have accidentally activated this mode by pressing a special key (often found in the row of keys with special functions: F1, F2, etc.) or some key combination.
Some devices also have a separate button (usually with an antenna icon) or a toggle for turning the wireless network on or off.
To enable scanning for Wi-Fi networks, click the airplane icon in the lower-right corner of the screen and disable Airplane Mode. Another option is to go to "Start" → "Settings" → 'Network & Internet" and disable Airplane Mode there.
Another option (if your laptop has a Wi-Fi key or switch) is to make sure the Wi-Fi switch is in the "On" position. Typically, the indicator on the key will be lit.
2. Wi-Fi is disabled
Another cause could be that Wi-Fi is simply disabled. Let's see how to enable Wi-Fi in the latest versions of Windows. In Windows 10, click the network connection icon in the notification area and make sure the Wi-Fi button is on. Check that "Airplane Mode" is disabled.
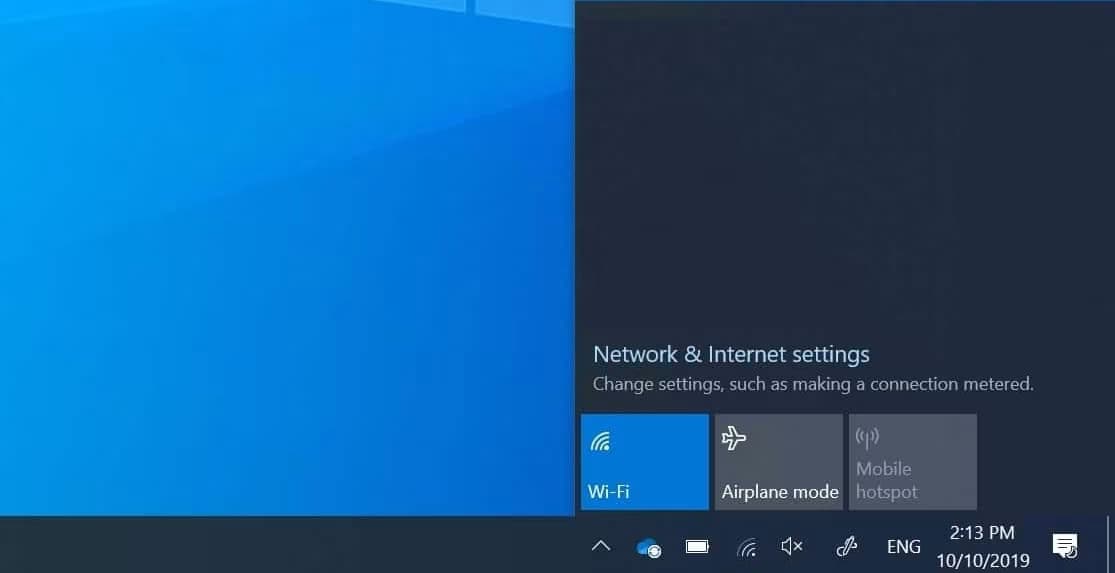
In the latest version of the operating system, you can enable and disable Wi-Fi in "Settings" → "Network & Internet" → "Wi-Fi".

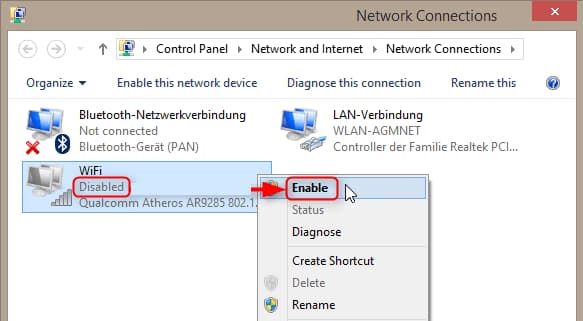
In Windows 7 (although this can also be done in Windows 10), go to “Network and Sharing Center” (see how to access the Network and Sharing Center in Windows 10), select “Change adapter settings” on the left side (you can also press Win + R and enter the following command: ncpa.cpl to access the list of connections), and look at the wireless network icon (if it's not displayed, you can skip this section of the guide and move on to the next one, about installing drivers).
If the wireless network is “Disabled” (grayed out), right-click the icon and select “Enable”.
In Windows 8, it's best to proceed as follows and perform two actions (in our experience, these two settings can work independently of each other – meaning they may be enabled in one location and disabled in another):
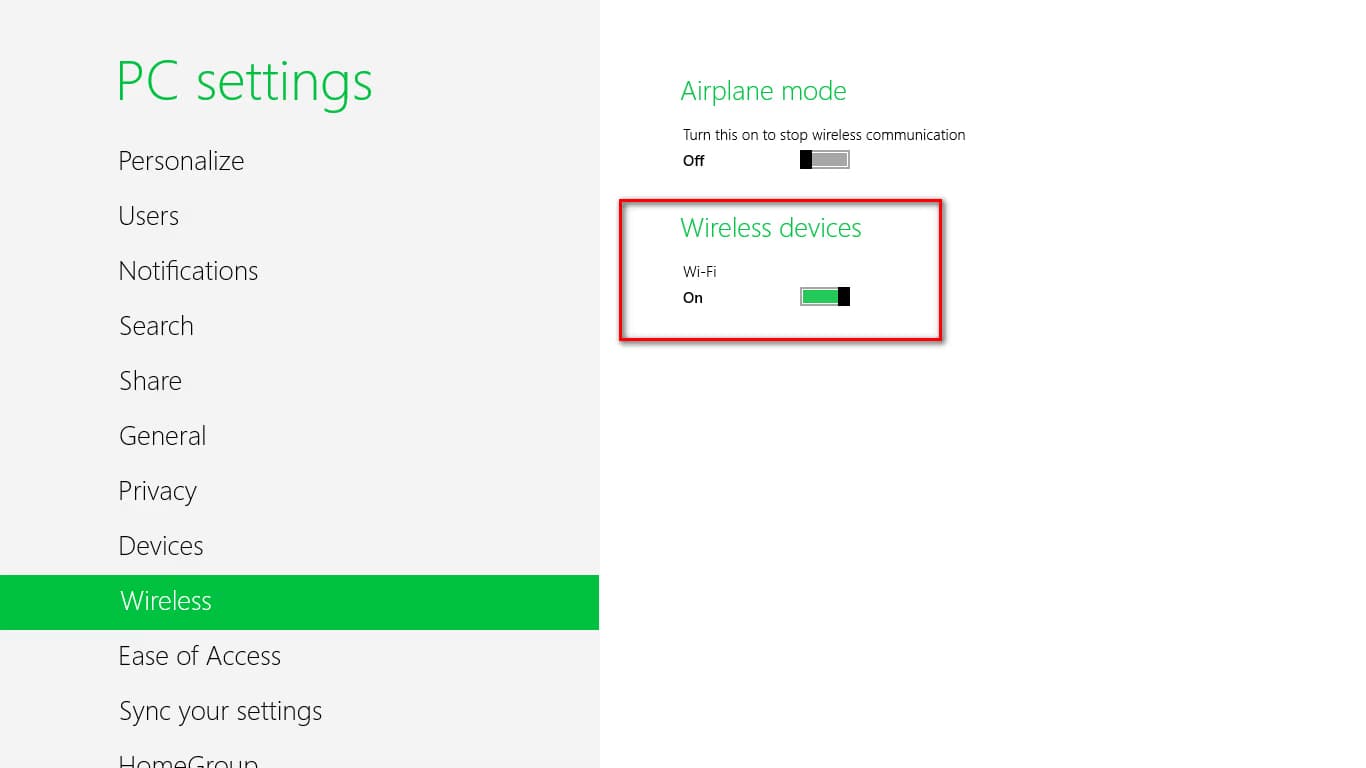
- In the right pane, select "Settings" → "Change computer settings", then select "Wireless network" and make sure it's enabled.
- Perform all the actions described for Windows 7, i.e., ensure the wireless connection is enabled in the connections list.
3. The laptop is too far from the Wi-Fi router
If the laptop is too far from the router or there are many walls between the devices, the Wi-Fi may not reach the computer. The solution is simple: move closer to the router and try connecting again.
Sometimes you need to use your laptop where the signal is consistently weak, and moving it closer to the router isn't an option. In that case, you should purchase and install a Wi-Fi extender between your computer and the router.
4. An incorrect password was entered when connecting to the network
Another reason why your laptop won't connect to Wi-Fi is simply having entered the wrong password. Many passwords are long and have a complicated alphanumeric sequence, so it's advisable to check it carefully, at least twice.
If you've forgotten your password, the most appropriate and accurate way would be to look for the information on the router or consult an authorized specialist from your internet provider.
5. Restart your laptop
Wi-Fi issues can be caused by temporary Windows glitches or drivers that haven't been fully installed or updated. The easiest way to resolve this is to restart your system.
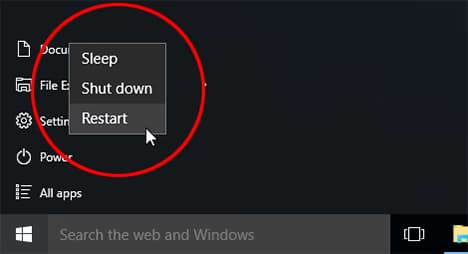
Click "Start" → "Power button → "Restart" (or "Update and Restart" if updates are available for your system). Wait for your computer to restart and check if the problem is resolved.
6. You need to restart your router
If you have multiple devices, and they're not connecting to your Wi-Fi network, the culprit could be your router. Restarting your router can resolve connection issues. The router restart process may vary depending on the device. On modern models, there's usually a dedicated button on the router's body for this. If you don't have one, unplug the router from the power source, wait a minute, and then plug it back in.
You can also initiate the restart from your router's settings. Open a browser and enter the router's IP address—usually 192.168.0.1 or 192.168.1.1. (Check your router's documentation for this information.)
A panel will appear with fields for the username and password to access the settings. By default, the following combinations are often used for the username (login) and password (password): "admin" and "admin" or "admin" and "password". If they don't work, find the correct combination in your router's manual or with your internet provider.
Once you access your router's settings, click the "Reset" button — sometimes it's on the main settings page, other times in the "Administration" section. Wait at least two minutes and then try connecting to Wi-Fi again.
7. Problems with the Wi-Fi network profile
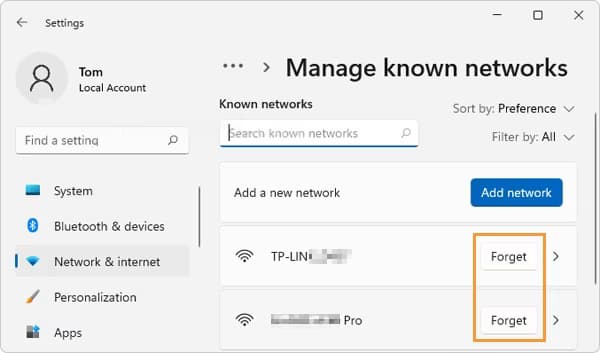
It may seem counterintuitive, but sometimes Windows correctly detects a Wi-Fi network if you ask the system to forget it and then add it again. The most important thing is not to lose the password, or you won't be able to reconnect. Press the Win + I keys to open the "Settings" menu. Then, open "Network & Internet" → "Wi-Fi" → "Manage known networks". Select your network and click "Forget". Wait a moment and then try connecting again.
8. You need to reset your network card
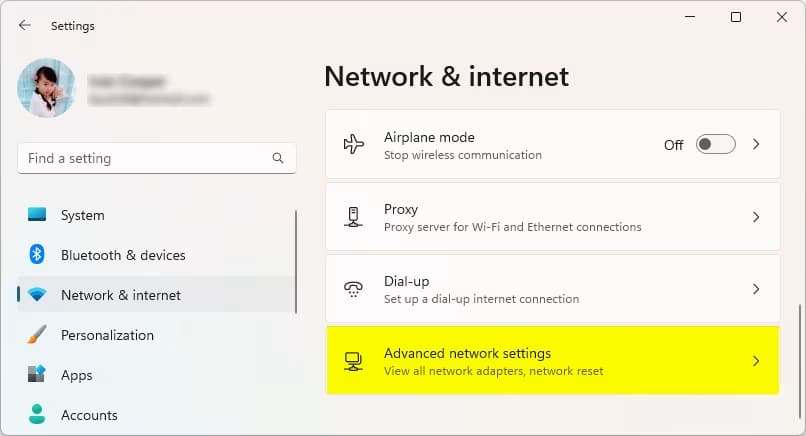
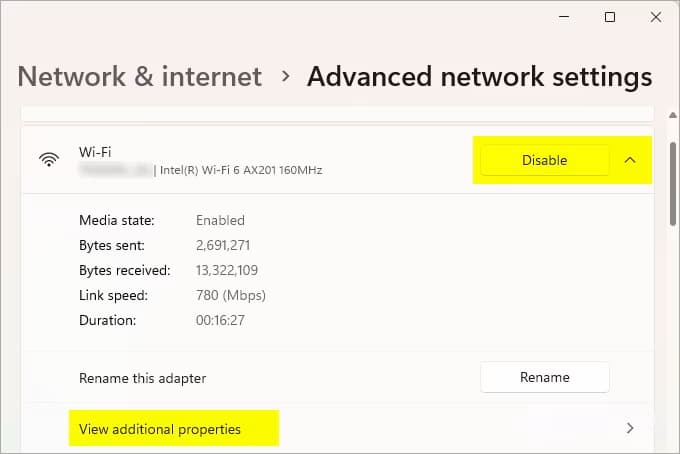
Your laptop's network card is responsible for both wireless and wired connections. If your network problems are caused by a faulty card, you should disable and re-enable it. Press Win + I to open the "Settings" menu. Then, click "Network & Internet" → "Advanced Network Options".
Select your Wi-Fi adapter and click the "Disable" button. Wait a moment and then click "Enable".
9. You need to reset Windows network settings
If your laptop is the only device unable to connect to Wi-Fi, while your phone, tablet, and other devices are having no issues, try resetting your network settings. Press Win + I to open "Settings" and click "Network & Internet" → "Advanced Network Options". Find the "Network Reset" button and click it. Your computer will reset all settings, and you'll be able to connect to your Wi-Fi network as if it were the first time.

10. You have selected an incompatible network
Most modern routers have two Wi-Fi frequency bands: one marked 2.4 GHz and the other 5 GHz. Typically, the 2.4 GHz band offers better coverage and supports more devices, while the 5 GHz band provides faster speeds. Many devices (older ones) don't support the faster communication standard (5 GHz). If you can't connect to the Wi-Fi network marked as 5G, select the network with the same name, but without the 5G marking or with the 2.4 notation. Your computer's wireless module may not support 5G connections, and changing it to 2.4 may resolve the issue.
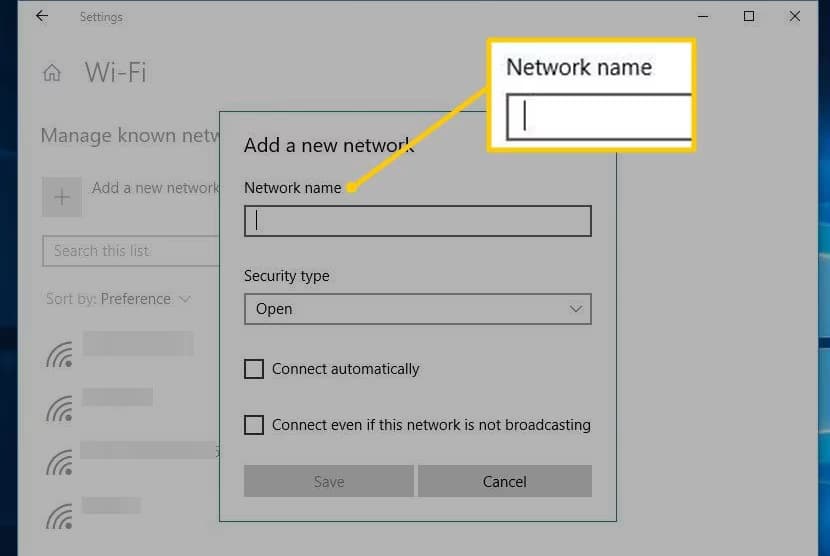
11. The Wi-Fi network is hidden
Some Wi-Fi networks have their name (SSID) broadcast disabled. Typically, the router broadcasts its name so that all nearby devices can detect it and connect. Some users hide this information so their router doesn't appear in the list of available access points. This is done as extra protection against neighbors eager to use someone else's Wi-Fi.
If your network is hidden, you'll have to connect manually. Press the Win + I keys to open the "Settings" menu. Then, click "Network & Internet" → "Wi-Fi" → "Manage Known Networks" → "Add Network". Enter the SSID (network name), select the security type, and enter the password. Then, click "Save".
If you don't want the SSID to be hidden, you must change this in your router's settings. Open a browser and enter the router's IP address—usually 192.168.0.1 or 192.168.1.1. (Check your router's documentation for this information.)
A panel will appear with fields for the username and password to access the settings. By default, the combinations "admin" and "admin" or "admin" and "password" are often used as the username (Login) and password (Password).
In the settings, look for the Wireless Settings section. It may have different names on different models. Find the "Hide SSID," "Broadcast SSID," or a similar option and enable or disable it, depending on your needs.
12. Network Card Driver Problems
Sometimes, the inability to connect to Wi-Fi is related to a faulty network card driver. Let's try reinstalling it. You'll need an internet connection. Take a LAN cable and connect one end to the router's port and the other to your laptop. This is a temporary solution that will allow you to access the internet without Wi-Fi.
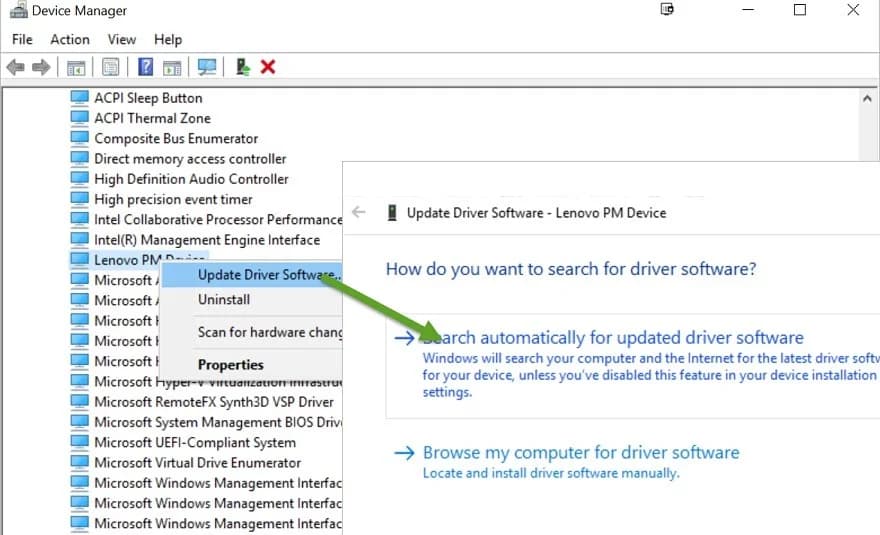
In the next step, press the Win + X key combination and select "Device Manager" from the pop-up menu. Find the "Network Adapters" category and expand it (click the + sign).
Right-click your network card and select "Update Driver". Then, select "Search automatically for updated driver software". If Windows finds a new driver, it will install it.
An update is not always enough, and it is necessary to delete and reinstall the driver before updating. Right-click your network card and select "Remove Device". In the window that appears, confirm the action.
Then restart your computer. Windows will attempt to automatically install the driver upon restart. On some specific laptop models (often with older devices), the standard Windows driver isn't suitable. In these cases, you need to install the driver specific to your laptop model.
To resolve the issue, open the manufacturer's official website and search for your model—you'll need to enter the name or serial number in the search bar. Then, in the downloads section, find the network card driver, download it, and install it (to install it, simply click on the downloaded file and, in the window that appears, click "Next" until the "Install" button appears).
13. The computer has the time set incorrectly
An incorrect system time setting can prevent your laptop from connecting to the internet. This can happen if you haven't turned on your laptop in a long time, if the BIOS settings have been reset, or after a failed update.
To set the time correctly, you need to enter your laptop's BIOS. How to do this depends on your computer model — typically, you have to press the Del, F1, F2, F8, or F12 key upon startup. Read our guide to understand how or consult your laptop manufacturer's manual.
Once in the BIOS, look for the configuration section that includes system time settings. They may be called General Settings, Main, Standard CMOS Features, among others.
You'll need to find the System Time or System Date option. This allows you to enter the hours, minutes, and seconds in 24-hour format, as well as the date, month, and year. Make sure the data entered is correct, then save the BIOS settings and restart.
If the time in the BIOS is correct but not in the system, right-click the clock in the corner of the screen and select "Adjust Date and Time". Specify the correct time zone, uncheck "Set time automatically", and enter the correct values.
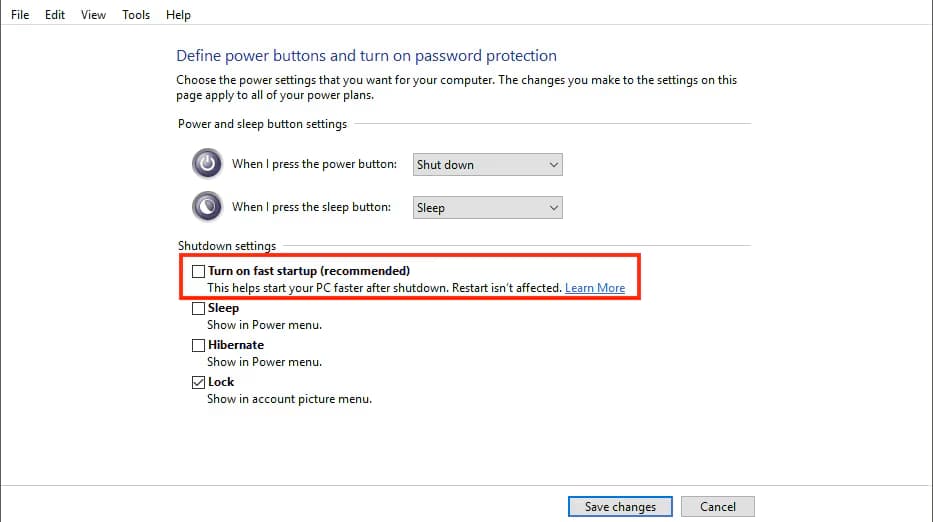
14. The "Fast Startup" feature is interfering with the Wi-Fi connection
You may have noticed this pattern: Wi-Fi never connects after the first time you turn on your computer, but if you restart it, the network works correctly. This happens when the default "Fast Startup" power feature interferes with the system. It's a rare issue, but it does happen.
- Click "Start" and open "Settings".
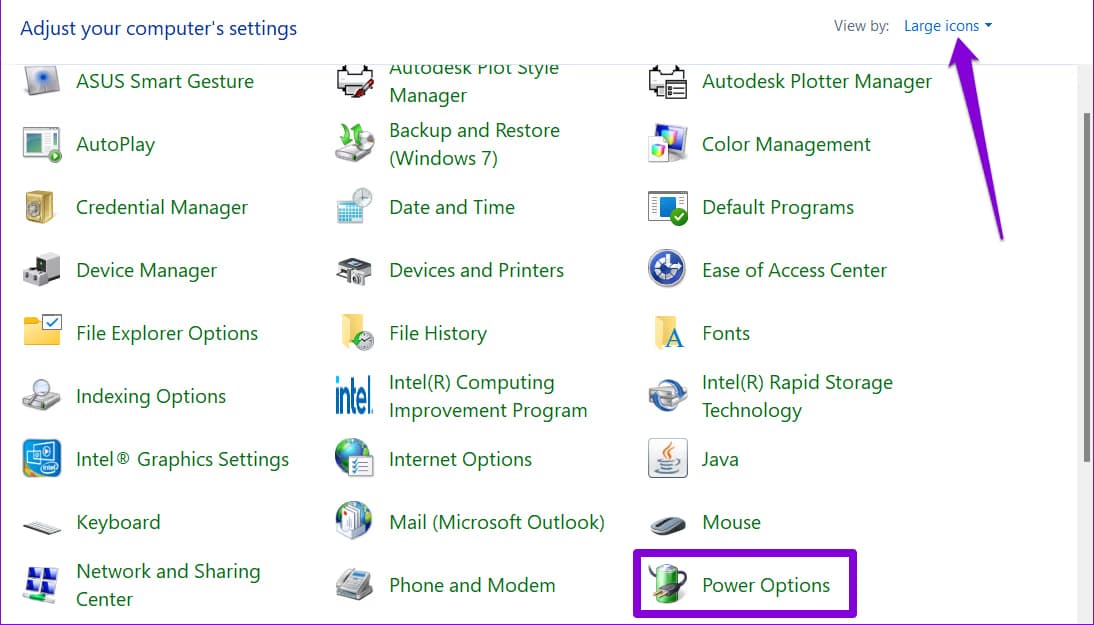
- Click on "System" in the left menu, then click on "Power Options".
In the window that opens, find the "Choose what the power buttons do" section on the side. Click "Change settings that are currently unavailable" and uncheck the "Turn on fast startup" option. Click "Save Changes". Turn off your computer, then turn it back on. Check if everything works.
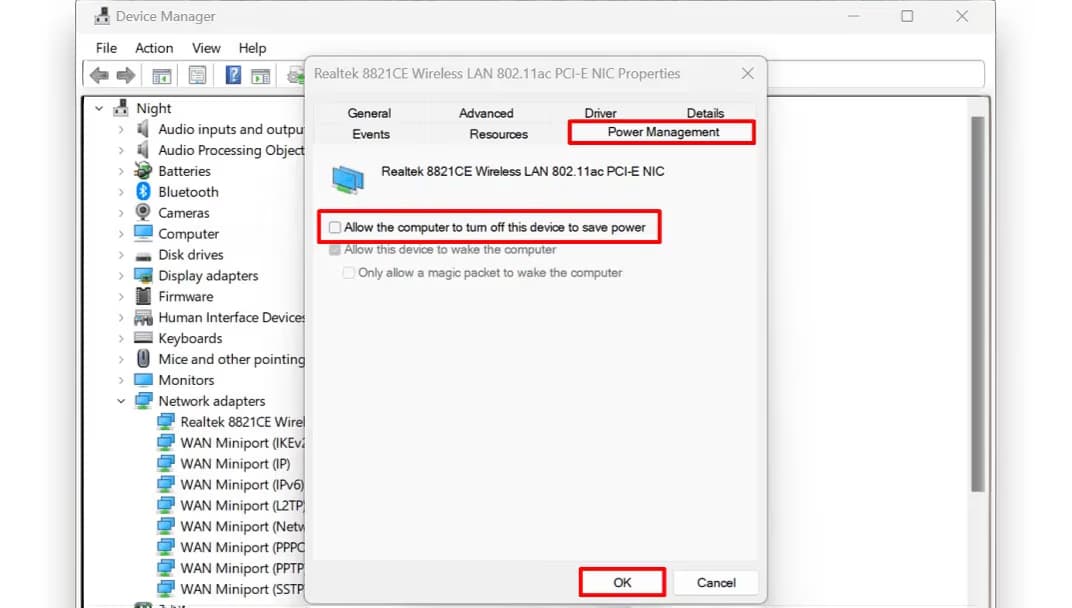
15. The system turns off the Wi-Fi adapter to save power
Wi-Fi may work fine on your laptop when it's "awake". But if you leave it idle for a short time, it goes into sleep mode. And when you wake up the system, the Wi-Fi refuses to reconnect. This may be due to the computer's power consumption policy, which disables the Wi-Fi module during sleep, and for some reason, you can't turn it back on.
To fix this, press the Win + X keys and select "Device Manager" from the pop-up menu. Find the "Network Adapters" category and expand it (click the + sign).
Right-click the network card and select "Properties". In the "Power Management" tab, uncheck the "Allow the computer to turn off this device to save power" option and save the changes.
Next, click "Start" and type "Power". Open the item with the green battery icon and find the active power plan. Click the blue "Configure Power Plan" → "Change advanced power settings". In the window that opens, in the "Wireless network adapter settings" section, set "Maximum performance" and apply the changes.
Now, Windows will not disable the Wi-Fi module during sleep.
16. There is an IP address conflict on your home Wi-Fi network
To resolve this type of issue, you can try changing the IP address of the device that's having connection trouble.
How to do it on Windows:
- Press the Windows + R keys simultaneously. The Windows command line will immediately open.
- Enter just three letters in English: cmd and press Enter.
- In the window that appears, type the command ipconfig/release and press Enter.
- Now it's time for another command: ipconfig/renew. Press Enter again and you'll get a new IP address.
- Try connecting to Wi-Fi again.
How to do it on macOS:
- Click the bitten apple icon in the upper-left corner of the screen — this is the Apple menu.
- Select "System Preferences" and click "Network" in the side menu.
- Choose the network service for which you want to update the IP address and click "Details".
- Click "TCP/IP", then "Request DHCP Address".
- The last and easiest step is to click "OK".
- Restart your device and try connecting to Wi-Fi again.
17. Connection is blocked by antivirus software
Of course, an antivirus is an extremely useful program that protects our device from malicious software, but it has its drawbacks: for example, it can sometimes interfere with the internet connection.
Solving this problem is quite simple: temporarily disable the antivirus software in the app itself.
Restart your device and check if you can now connect to the network.
18. Router Settings Reset Required
If not only your laptop but all the devices in your home, can't connect to Wi-Fi, try resetting your router's settings. This is an extreme measure that you should only resort to after trying all the steps described above.
Keep in mind that you'll need to know how to configure the router yourself, without help from your ISP.
Before proceeding with this step, save your ISP's username, password, and sometimes DNS server address.
After completing this step, open a browser and enter the router's IP address—usually 192.168.0.1 or 192.168.1.1. (Check your router's documentation for this information.)
A panel will appear with fields for the username and password to access the settings. By default, the combinations "admin" and "admin" or "admin" and "password" are often used as the username (login) and password (password).
Go to the "Administration", "System", or similar section—names may vary. Look for the "Reset Settings", "Factory Reset" or similar button and press it.
You can also reset the router's settings using the physical button on the back (it's usually small and recessed into the body to prevent accidental pressing). To do this, use a sharp, non-cutting object—a paper clip, a cell phone SIM tray opener, or something similar.
Wait a few minutes. Once the router reboots, configure it again if necessary.
Conclusion
Well, that's probably all, I think from all this information you will be able to extract for yourself exactly what is suitable for your situation.
Comments